Showing posts with label starter. Show all posts

Friday, May 29, 2020

A Baked Dozen... Baked Scotch Eggs


I made Scotch eggs last night. I've only had Scotch eggs on a few occasions, but they have always been fabulous. The first time I had one my sister in law made them, the second was at the Renaissance Festival... and then I had one at a street stall in London... So not only were they good they also had wonderful memories to go along with them. So when I decided to make them at home they had some pretty big shoes to fill.

There are many theories about the origin of the Scotch egg . In 1809 there was a recipe published that is similar to this dish, but in this recipe you smother your egg in gravy. Other sources suggest that it was inspired by an Indian dish called Kofta. One source says that in the original dish the egg was smeared in fish paste rather than covered in sausage...and still another possibility is that it was invented by a London based department store and sold as travelers food as early as 1738. Whatever the origin these eggs are packed with flavor and a lot of fun to make.

Normally these eggs are served as street or as a bar food and they are fried. While this recipe is by no means low fat or healthy it is baked instead of fried so it's a little lighter than the original dish. We made these for dinner last night and served them with a salad. I doubled this recipe so we would each have one for breakfast as well.


Scotch Eggs


4 eggs
1 lb sausage
1/2 tsp nutmeg
1 tsp mustard
1/4 cup each parsley and chives
Salt and pepper to taste
2 eggs, beaten (I did not need to double this when I doubled the recipe
flour
bread crumbs


Directions
Put the eggs into a medium pan, cover with cold water and bring to the boil. Boil for 4 minutes, then transfer to a bowl of ice cold water. Peel them when cooled.

In a medium bowl combine sausage meat with nutmeg, mustard, parsley, chives, salt and pepper. Divide the mixture into four parts.
Take one piece of sausage mixture, form a ball and flatten into a patty. Roll the egg in flour and shape the sausage patty around each egg.
Pre-heat oven to 400F 
Roll each meat wrapped egg into flour, then dip into beaten eggs and coat with crumbs.

Place on a baking sheet and bake for 35 minutes until the sausage is completely cooked.
Rest for 5 minutes before serving.


Wednesday, May 20, 2020

What's the Difference Between a Spring Roll and a Summer Roll?

SEASONING!

Actually that is not the difference at all... but I can't resist a corny pun.

Summer Rolls, or Gỏi cuốn  in Vietnamese, are the perfect combination of fun and flavor. They are light and full of healthy ingredients. They are the perfect meal for a hot day. We always make them at the dinner table so each one is custom made and everyone has a blast making them. I always thought these were called these spring rolls, but spring rolls are crispy and have a wheat flour skin.
Banh Trang Spring Rolls Skin
Summer rolls are wrapped in  a rice paper skin like the one pictured above.  You simply soak the wrapper briefly and then fill it with whatever you want. There really isn't a recipe.

Rice Noodles (Vermicelli) — Rice, Noodles and Rice Paper — Asian ...


For mine I simply cut cucumbers, green onions and carrots into match sticks.  I boiled shrimp, peeled them and then cut them in half. I cooked some rice noodles and grabbed some lettuce leaves out of the fridge. Then I made a sweet chili sauce and we were ready to roll... literally. The only hard part is resisting the urge to overstuff them... if you put too much in them it is difficult to roll them up.

When you roll it simply place your soaked wrapper on a damp towel and roll it up like a burrito: Fold one end down over the filling, roll it up and then fold the other end down... and wah-la... a perfectly rolled summer roll. 

I made this chili sauce to go with it:
1/4 C. rice vinegar
2 T. water
2 T. sweetener - I used honey (the recipe called for maple syrup) but I think next time I'll use sugar
1 T. soy sauce
1 clove garlic
1 inch ginger, minced
1 t. red pepper flakes
juice of one lime

The recipe I modeled this after was vegan most recipes use fish sauce instead of the the soy... it's all up to you.

You can also make a peanut sauce... just google it.

What would you like in your summer roll?


Tuesday, April 28, 2020

When Buffalos Fly

It has been a long time since I have written a blog entry. I am really out of practice... and I am not really sure why I decided to write my first entry in years about Buffalo wings... but here it is. I am going to try to write something daily. Typically this blog was about food and food lore, but for now I think I'm just going to write about anything that I find interesting.

I often feel bored right now, but feeling bored doesn't have to be a bad thing. Sometimes it can force you to try new things or look at something common and day to day in a new way. Maybe if I write about it I will find ways to make the best of this time and put my boredom to good use.

Buffalo Wings

I love making hot wings. They are so easy to make at home and it makes things seem a little more festive. Especially now that going out to eat is not a possibility it is nice to add a little festive into the mix. 

Buffalo wings were invented at a bar in Buffalo, New York in 1964. They weren't popular outside of New York until the mid-80s. Now it is hard to imagine a game night party without them. They are usually served with blue cheese and celery. Although here in Texas you are just as likely to see them served with Ranch.

The classic buffalo wing sauce is made with butter and chili sauce, but now that there are so many restaurants devoted entirely to hot wing there are countless possibilities. They range from the tame all the way to the 5 alarm fire variety. Here are the two I make the most. If you have a good recipe for hot wings then let me know in the comments. You can even share a link to your recipe.

Here is how I make mine:

To cook wings-

Preheat oven to 450°F. 


Arrange wings on large foil-lined pan. Bake on lowest oven rack for 30 minutes or until crispy, turning once. I usually make a lot and so I can sauce them two different ways.


Classic Sauce:
  • For 2 ½ lbs chicken
  • ½ c. hot sauce 
  • ⅓ c. butter, melted
Mix butter and hot sauce in medium bowl; set aside. Toss wings in sauce mixture until well coated. Serve with blue cheese and celery, if desired.


Spicy Korean Sauce:For 2lbs chicken
  • ¼ c. gochunjang
  • ¼ c. soy
  • ¼ c. sugar
  • 1 tsp ginger
  • 2 tsp rice vinegar
  • 2 T water
  • Green onions and sesame seeds to garnish

Combine all but garnish and bring to a boil. Reduce to medium low and cook for 3-5 minutes.Mix butter and RedHot Sauce in medium bowl; set aside.


When I made these the other night I was in the middle of planning a multiplication lesson for my third grade class. Teaching from home is not really natural for me. Without the face to face interactions it I have to dig deep to find the personal connection to it... That is what inspired me to arrange my food into arrays and use it to teach hot wing and tater tot math.


I made buffalo wings last night.  I arranged the wings in 8 rows and each row had 6 wings.  How many wings did I make? If I divided the wings equally between myself, hey husband and my two kids then how many would each person get?


Tuesday, February 15, 2011

Mmmmm Sushi....


I went out for sushi last night with my husband to celebrate Valentine's Day (a day late I know). We had some wonderful yellow tail sashimi... we also had sea bass, tuna, mackerel, snapper and eel sushi, and spicy salmon and tuna rolls. I didn't bring my camera... it was a date night after all... but I did find a lovely picture of sushi on Wikipedia. I love going to the sushi bar... I especially love the sashimi. We sometimes get take out sushi at the grocery store (that is what we did for dinner on Valentine's Day-bonus 2 nights of sushi in a row) or eat sushi at a buffet... but it is never the same thing as actually going to the sushi bar.


Here is a list of Sushi Etiquette that I found on a site many years ago called sticky rice...I even won a t-shirt from them for a story I wrote about catching eel and making my own unagi... I don't know what happened to it (the web site that is... I still have the eel story and will share it some day when I get the word processor on this computer working)... Stickyrice.com no longer exists (at least not in the same form) as far as I can tell unless it is under another name. The credit for this list, however, goes to them...

Sushi Etiquette


1. Do not pass food directly from your Chopsticks to somebody else's chopsticks. The reason is a bit morbid, but this mimics a Japanese funeral ceremony.

2. Do not spear food with you chopsticks.

3. The proper way to dip your nigirizushi is fish side down. Dipping your sushi rice side down is not only bad manners, but it also makes the nigirizushi fall apart.

4. Tipping at the bar… In most sushi restaurants the wait staff and the chef tip share. If you wish to insure that the chef gets his share then while lying the tip on the bar let the chef know that the tip is for him. When tipping the wait staff let them know that you have already taken care of the chef. 15% for the chef and 10% for the wait staff is customary. (I think most restaurants use tip share, however... so I wouldn't worry too much about it... I ususally just leave 20% and let them work it out)

5. Do not rub chopsticks together if implies to the chef that the chopsticks are cheap.

6. Do not pull a dish towards yourself using your chopsticks. Use your hands for you dish-pulling needs.

7. If you take food from a shared plate use the reverse end of your chopsticks rather than the end that goes in your mouth.

8. Never bite into a piece of sushi and replace the uneaten portion on your plate. Once you pick a piece of sushi up eat all of it.

9. It is impolite to leave food on your plate… especially rice.

10. Sushi is meant to be eaten with your hands (except for sashimi)… it is not impolite to use your chopsticks, but it is unnecessary (If you are inexperienced with chopsticks it is impolite to drop you sushi and splash soy sauce on your companion.).

Wednesday, November 10, 2010

BOW Ourdoor Cooking Class

As I promised here is a little more about my experiences this weekend with BOW (Becoming and Outdoors Woman). One of the many highlights of my weekend was my outdoor cooking class. I really enjoyed it and learned a lot about all the new equipment that is out there but I also learned tips on using some of the old fashioned technology like Dutch Ovens.Here is an assortment of cooking gear for the back packer: A pouch to carry utensils and spices, a small propane stove with an extra light cooking pot, and a fold up fire pit (it is the item that looks like a vegetable steamer).
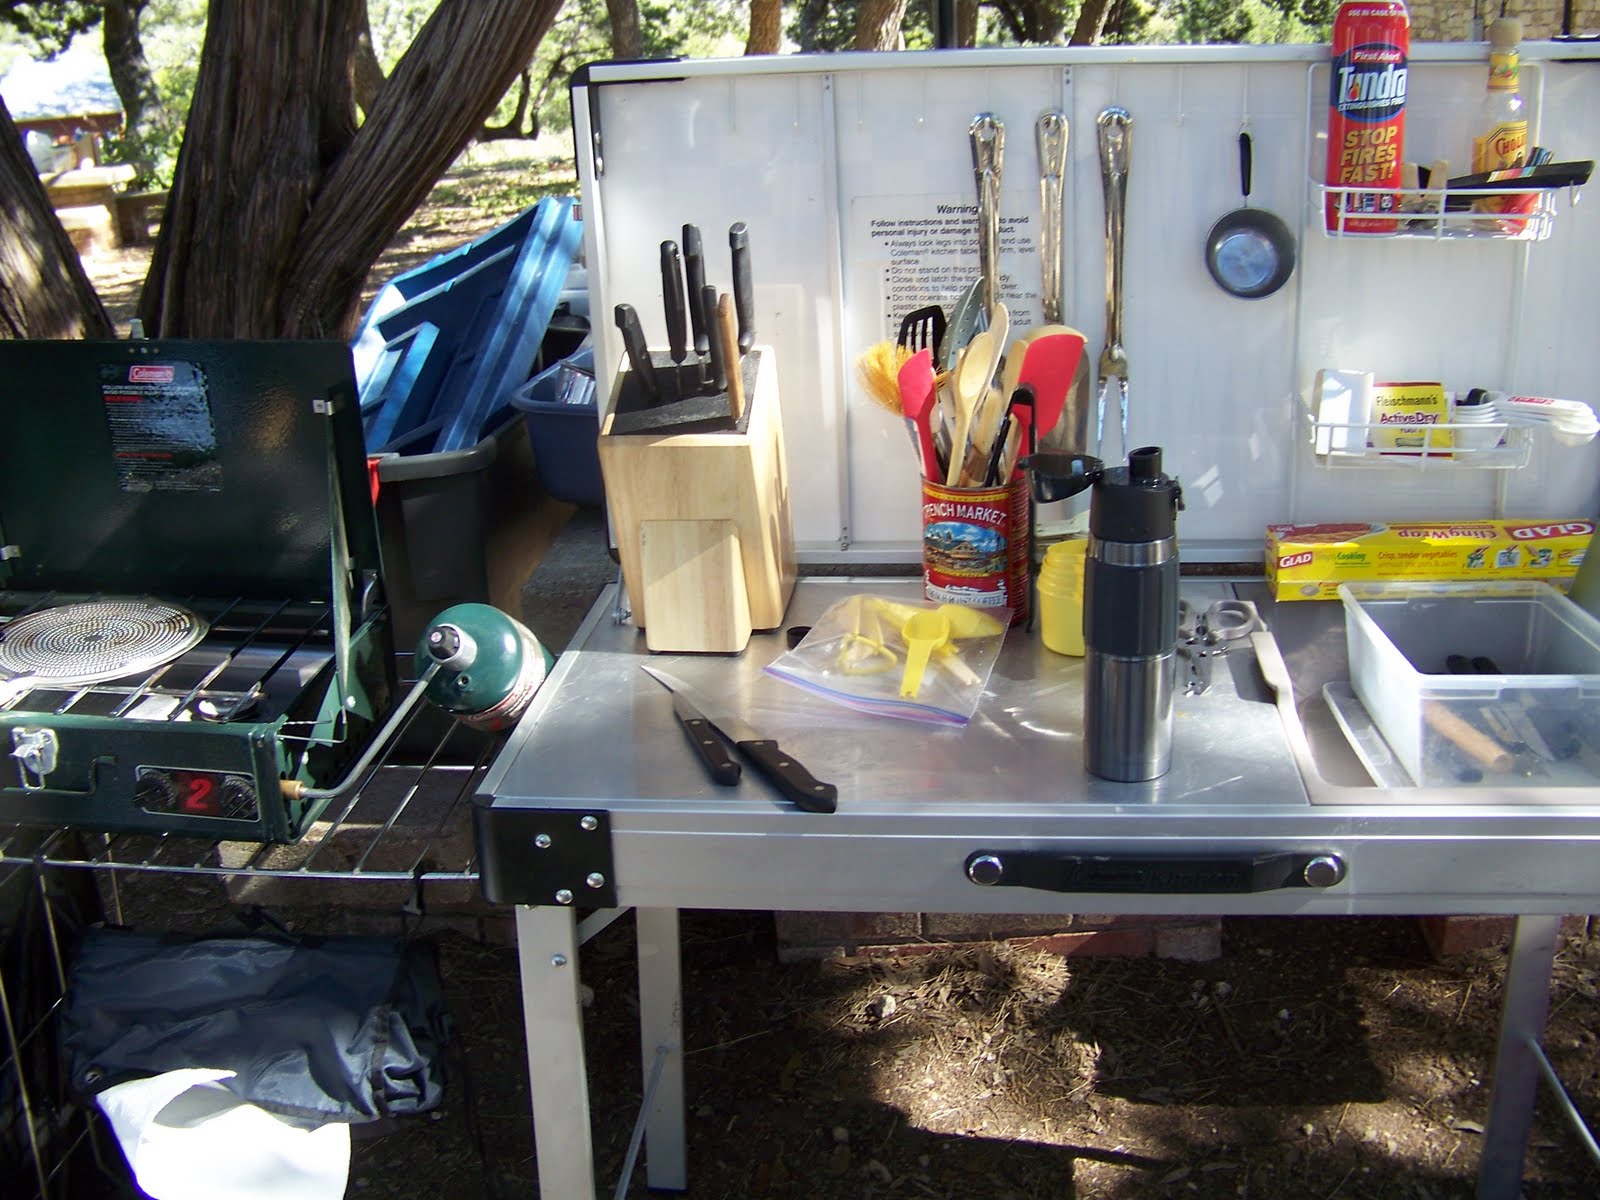


This on the other hand is a fully stocked outdoor kitchen for the luxury camper or tailgater. It even has a small sink for washing dishes and plenty of room to store all those gadgets that some of us don't like to live without.


Here our instructor is whipping up some cowboy coffee. He put the grounds inside a bandanna. Along with the grounds he placed an egg that he lightly cracked in order to keep the grounds from escaping into the boiling brew. He then dropped the coffee into a pot of boiling water and cooked it until it reached the desired strength. I plan on doing some experimentation and research about the egg method. I've read about it but this was the first time I'd seen it demonstrated and I must say my interest is peaked.


For our starter we made Salmon on a cedar plank. Our instructor seasoned it lightly and then topped it with lemon slices and a sprig of rosemary. The cedar plank must be soaked for several hours prior to cooking (preferably overnight). He then placed the plank on a propane grill and lowered the lid until the fish flaked easily.


Here is the finished product. We ate it on crackers for some truly gourmet camping fare.


Next we made tin turtles. To make these you simply wrap meats and veggies up in a small sheet of foil and place the packages directly on the coals. I've made these before... but this time I learned a new trick. Simply line the foil with cabbage leaves to prevent the veggies from burning. The cabbage leaves will burn (and frankly they smell pretty awful)... but once you get past that you'll enjoy nicely cooked vegetables and meat without the typical overcooked bottom layer.


We each labeled our tin packages with fingernail polish so that we could eat our own custom made creation. The fingernail polish will weather the fire better than most other methods.


Here is my finished creation. The burned mess on the bottom is the cabbage leaves... but once I poured my meal into a bowl it was cooked to perfection.


The next dish was Cornish hens cooked in a Dutch Oven. First he rubbed butter under the skin and seasoned them with rosemary, parsley and chives. Then he simply placed them in a Dutch oven with some baby carrots and broccoli. He placed the coal under the oven and then cover the lid with more coals and baked these babies for about 45 minutes-1 hour. Mmmmmm.


Here are the birds cooked to perfection. I was really impressed with how easy and yet elegant this dish was.


Before we even arrived our instructor whipped up a batch of sour dough biscuits and set them to rise. He keeps a batch of sourdough starter on hand for just such occasions and he showed us how to prepare the Dutch oven for cooking. He said that any sour dough biscuit recipe would do... I found this one on line... and I plan on trying this once I get around to buying myself a Dutch oven.


Here is the finished product. We ate these delicious treats with lots of butter and honey. They were fantastic!


Last, but not least, we made some peach cobbler. First we melted a whole stick of butter in an insert pan and added two large cans of peaches in heavy syrup and a tablespoon of cinnamon. I was responsible for adding the cinnamon... and oops... a slip of the wrist and half the jar went in... but no worries it was wonderful anyway. After the peaches came to a boil we sprinkled a box of yellow cake mix on the top (to make the crust ).


Once the ingredients were all added to the mix we simply arranged the coals around the Dutch Oven and waited.


And here is the finished product. I found a similar recipe online for anyone who is interested. You can find it here.

After this meal fit for a king class it was time to head to dinner. Yikes! I ate a big salad and then waddled back to my room.
Cheers,
Jenn

Monday, May 3, 2010

Tapas


Tapas are little dishes. In Spain tapas are served before lunch and dinner in bars and taverns. They are also late night fare for bar goers. One legend about the origin of Tapas is this: In Spanish tapar means "to cover" and the first tapa was a slice of ham served on top of a glass to keep out the flies...because the saltiness of the ham increased sales the tradition followed. Another tale says that the Spanish king Alfonso the 10th was ill. His doctors prescribed that he have small bites of food with some wine between meals. The king then ordered that all the local inns couldn't sell wine without small dishes of food. Whatever the reason Tapas are wonderful.

For a simple tapas presentation I like to get cucumbers, tomatoes, and red bell peppers. Chop them up and put them on a platter. Serve with lemon wedges and drizzle with olive oil. Serve a variety of cheeses and meats with crackers and bread rounds are also a tasty addition. Maybe even some smoked salmon. Fresh fruits, small salads, and olives are also nice. If you want to make heartier fare then add some fried fish, steamed shell fish, shrimp cocktail or seasoned veggies like potatoes or mushrooms. Another common addition is the tortilla espanola. Presentation is important. Put everything on nice serving platters and garnish appropriately. Enjoy!

This past weekend we threw a party to celebrate our 15th wedding anniversary. For the party we had a selection of tapas and some cold beer (brewed by one of the guests), and some wine. Here is a list of the tapas we made for the party:

Stuffed Mushrooms (cooked on the grill)

Hummus with Bread Rounds

Peel and Eat Shrimp with Cocktail Sauce (I boiled the shrimp for a few minutes, chilled them and then mixed up some ketchup, horseradish, Worcestershire and lemon)

Spanish Spinach and Tomato Pizza
I sautéed 2 cloves of garlic and 1 onion in olive oil. I added a can of chopped tomatoes and cooked until the liquid was absorbed. I then add about 3 C. fresh spinach (I just added it by the handful until it looked right) and cooked until spinach wilted a bit. Then I spread it on a prepared pizza crust (you can use a "from scratch" crust... or for simplicity one of the Bobali types... the recipe I based this on made a pizza crust and cut it into small rounds for finger food size portions) and sprinkled it with pine nuts. I baked it for 10-15 minutes in a 400 degree oven.


Garlic Tomatoes
I cut several tomatoes in half and surrounded them with garlic cloves and topped with fresh thyme and salt and pepper. We then cooked them on the grill using indirect heat (at about 400 degrees) for about 40-45 minutes. To eat simply squeeze garlic on a tomato half and eat!

Berries and Melon


We also had some wonderful olives, shrimp stuffed cherry tomatoes, and other contributions by guests.

Thursday, February 4, 2010

Stuff your favorite fun guy with stuffed fungi on National Stuffed Mushroom Day!


A mushroom goes into a bar and sits down to order a drink. The bartender walks over and says, ''I'm sorry sir, but we don't serve your kind here.''
The mushroom sits back and asks ,''Why not? I'm a fun guy!

The ancient Egyptians called the mighty mushroom the plant of immortality. Technically speaking the mushroom is not a plant, however. It belongs to the fungus kingdom... and as for the immortality part-- well some mushrooms can make you feel a touch immortal (or so I've heard tell) but you got to look out because many of them can be fatal. It is rumored that the Buddha, Siddhartha, died of mushroom poisoning and some say that the Roman Emporer Claudius was murdered when fed death cap mushrooms. So if you aren't an experienced mycologist I would suggest sticking to the supermarket on your next mushrooming expedition.

Today is National Stuffed Mushroom Day (February 4th)and in honor of this festive occasion here is my favorite stuffed mushroom recipe.

Stuffed Mushrooms

12 large white mushrooms
1 t. olive oil
¼ c. minced onion
4 cloves garlic
¼ c. bread crumbs
1 T. parmesan cheese
Fresh herbs such as basil, thyme and oregano
Salt and pepper, to taste
¼ C. water

Remove stems from mushrooms and chop finely. Pre heat outdoor grill or oven to 375. If cooking outdoors place mushroom caps on lightly oiled grill pan or if baking use a baking sheet. In a small non stick skillet sauté stems, onions, and garlic until onions are tender. Remove from heat and add remaining ingredients. Mix well. Fill caps and bake or cook (using indirect grilling-cook next to not directly over the heat source) on prepared grill. Cook for 15 - 30 minutes.

Tamales and Karaoke